Milky Way Photography with a STANDARD Camera & KIT Lens!
Have you ever wanted to capture the Milky Way Photography but own a Kit lens? As a result, this blog will explain everything you need to know. It consists of a guide to the aperture, shutter speed and ISO required to obtain your first milky way image. Lastly, below is a step by step guided walkthrough of everything you need to know accompanied by sample images.
Milky Way Photography Equipment
- Micro Four Thirds, APS-C or Full-Frame Camera
- Standard Kit Lens
- Tripod
- Dark skies without light pollution
- Clear skies.
- 50% moon or less
Star Photography Pre-Planning
Dark Skies: With an app called “light pollution” displays the light pollution percentage around your area — additionally, a local weather app for clear skies.
Moon Phase: Photopills is an app I recommend for all your photography needs. Although googling the moon phase is also an option, Photopills will make your photography life easier in conjunction with the next step.
Location Scouting: Location scout your desired area during the day for foreground elements. Additionally, Photopills will assist you with the timing of the Milky way in your composition.
Focus to Infinity: Best practised during the day. Find focus at infinity with natural lighting; otherwise, this is extremely difficult at night. I will be doing a complete video regarding this topic on my YouTube channel – so please subscribe.
Setting up: A red light on your head-torch and waiting in the dark for 15 minutes to let your eyes adjust will help with the milky way's visibility.
Pro Tip: Switch your lenses OIS and AF off. Therefore, it will not hunt focus when pressing down the shutter. Switch off OIS when shooting on a tripod.
LEARN NIGHT PHOTOGRAPHY FROM HOME WITH THE CAMERA GEAR YOU ALREADY OWN!
Milky Way Photography Beginner Settings
Finally, let's get into the juicy part, camera settings. As a result, you will need to take full manual control of your camera. Therefore, change your camera's mode to "M" and follow the settings below.
Focal length: Set focal range to the widest of your lens – e.g. 18mm. Additionally, you can zoom in for a different composition, but this will reduce the star's amount and shutter speed. Therefore, keep your most comprehensive focal range and crop in post-production.
Aperture: Firstly, set your camera to the widest aperture – e.g. f/2.8 or f/3.5. Secondly, using the widest aperture of our glass will allow more light to pass through to your camera's sensor. As a result, it is giving you the brightest stars and Milky Way for the current conditions.
ISO: Start by using the ISO at 6400 to generate a base image. From here, we can increase or decrease the ISO later, depending on your conditions. The higher our ISO value, the more noise we will introduce into our image. Therefore, we will try and eliminate this after we have our base image finalised.
Shutter speed: Shutter speed will depend on our camera and lens setup. Therefore, once again, the app Photopills can work this out. Below is a basic rule to work out our shutter speed.
For example, A 18mm lens on a cropped sensor camera.
- 500 divided by Focal Range 500/18 = 27.78
- But we need to divide by the crop factor.
- Therefore – 500/18(x1.5) = 18.52
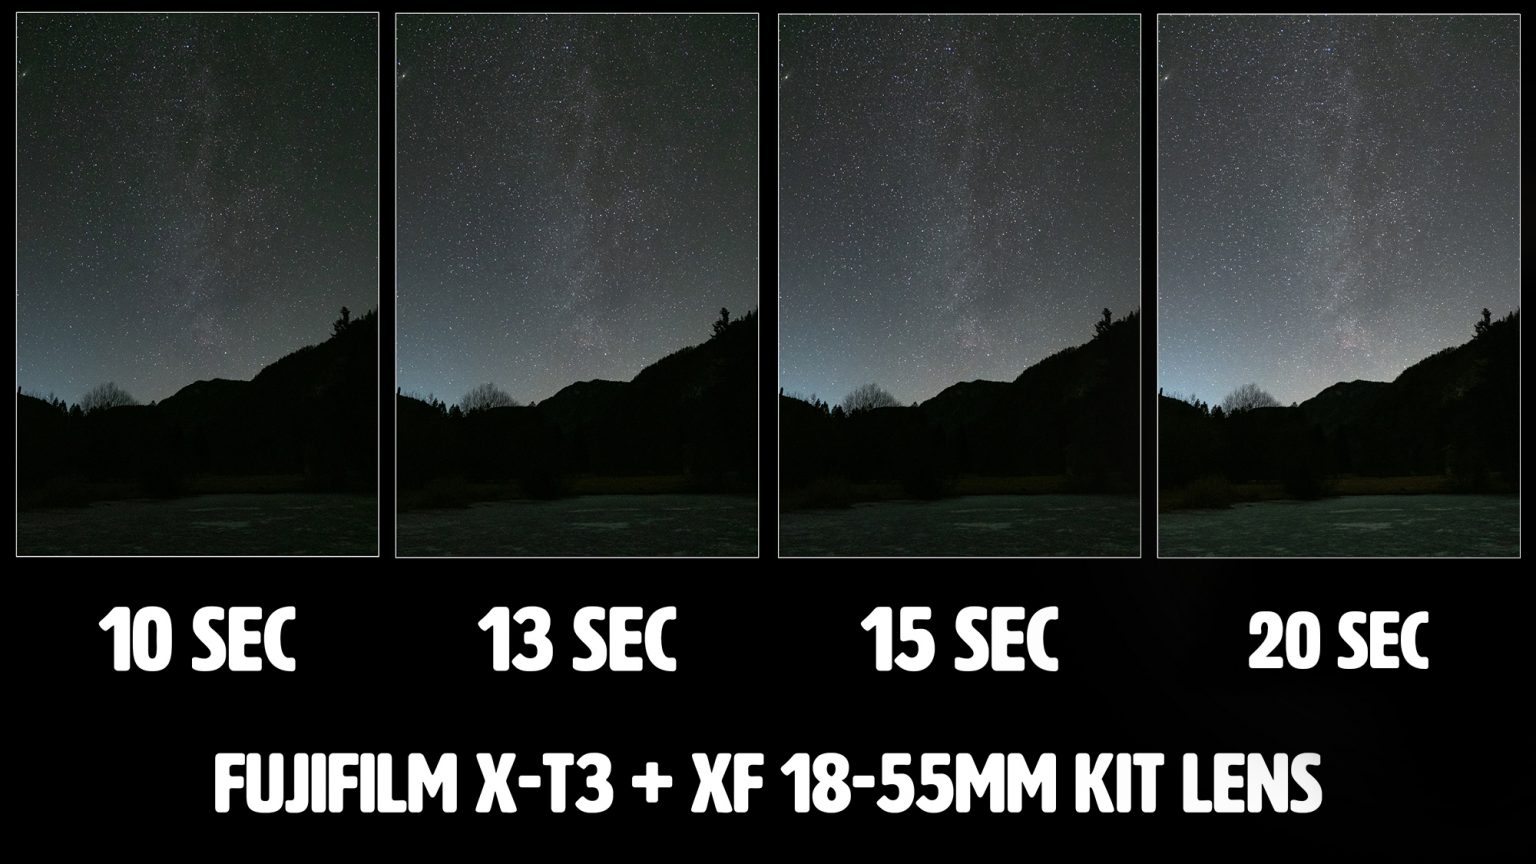
Below are four images with shutter speed changes. ISO is 6400, Focal range at 18mm and aperture at f2/.8 (or your widest aperture). Finally, here I am only comparing the star movement in the images at 10seconds to 20 seconds. You can download the pictures below.
DOWNLOAD ALL HELPING IMAGES HERE!!!

Kit Lens & Camera Night Photography
Comparing the images above, looking for visible star movement at 10, 13, 15 and 20 seconds. Previously, the Photopills app equated that 20 seconds was the perfect shutter speed for an 18mm lens, but this formula is a little outdated.
Therefore, we need to test this for our particular camera and lens setup. The X-T3 and XF 18-55mm F2/8-4 showed exceptional results at 13 seconds. At 20 seconds (at 100%), noticeable but only slight star movement occurred, offering the best results at 13-15 seconds. As a result, we now have our base image settings at 13 seconds, ISO 6400, MAX aperture and the most comprehensive focal range.
The last additional test I would compare for your camera and lens set up is the ISO value. However, this will vary depending on two factors, moon % and the camera's low light capabilities.
Running the same test as before at 13 seconds, now changing the ISO value from 3200-6400 – As I had no moon this night, I needed to use an ISO value of 6400 for a usable image. Finally, we have the perfect settings for our Milky Way Photography with a kit lens and Standard camera.
Therefore, we can start to experiment with our composition, camera angles and lighting. As a result, I added a human element into the composition to show scale as there was no exciting foreground in the area.
Milky Way Photography Kit Lens Settings
- In conclusion, run simple tests for the ISO and shutter speed for your particular camera. However, this will have some variants depending on light sources, e.g. moon, light pollution, cities or the light you use. Recommend SettingsISO 6400
- Shutter Speed 20 seconds
- Aperture MAX f/2.8 or f/3.5
- Widest Focal Length
PRO TIP: If the image is overexposed from these settings, lower the ISO before the shutter speed reduces the picture's noise. Make sure to read the histogram. Learn how to read a histogram here!
